dargeo
-
Postów
1 670 -
Dołączył
-
Ostatnia wizyta
Typ zawartości
Profile
Forum
Blogi
Wydarzenia
Galeria
Pliki
Sklep
Articles
Market
Community Map
Treść opublikowana przez dargeo
-
Czas najwyższy by potaniało. jak nie będzie kupujących to sprzedawcy sami zrobią rabaty
-
Odnośnie pogody

-
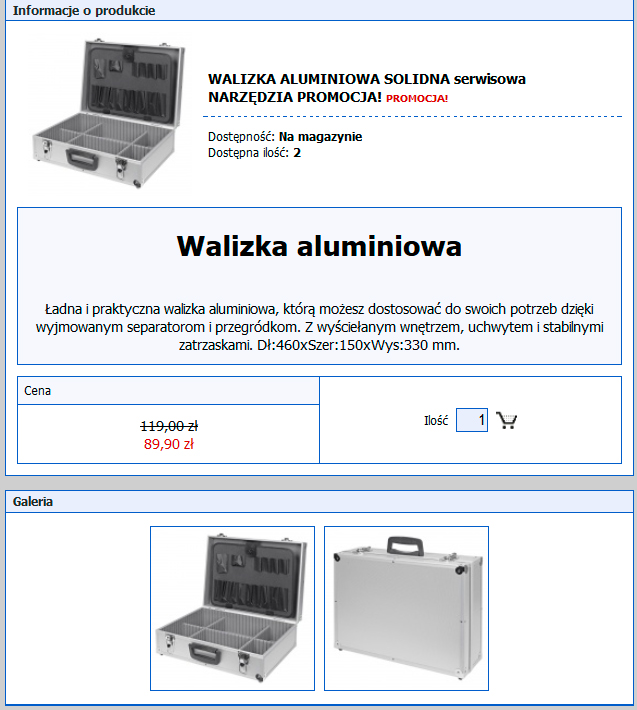
Nieaktualne Kamera Sbig ST237a i Walizka aluminiowa na okulary
dargeo odpowiedział(a) na pawel24 temat w Giełda: Archiwum
cyt:"WALIZKA cena 150 zł z przesyłką Paczka pocztowa priorytet po mojej stronie" Tak dla porównania odnośnie walizki
-
mam to samo
-
Pytanie. Co wybrać SW AZ-EQ6, Celestron CGEM czy Celestron CGEM DX
dargeo odpowiedział(a) na dargeo temat w Dyskusje o sprzęcie
bo to wielkie szczęście -
Pytanie. Co wybrać SW AZ-EQ6, Celestron CGEM czy Celestron CGEM DX
dargeo odpowiedział(a) na dargeo temat w Dyskusje o sprzęcie
albo szczęście czas pokaże -
Pytanie. Co wybrać SW AZ-EQ6, Celestron CGEM czy Celestron CGEM DX
dargeo odpowiedział(a) na dargeo temat w Dyskusje o sprzęcie
Mateusz nie wiem czy mój jest wyjątkowy ale bez gaidingu prowadzi spokojnie po 300s -
Pytanie. Co wybrać SW AZ-EQ6, Celestron CGEM czy Celestron CGEM DX
dargeo odpowiedział(a) na dargeo temat w Dyskusje o sprzęcie
sporo wykresów zamieściłem w wątku "sprzęt zakupiony" . Ja osobiście jestem bardzo zadowolony ale należy wziąć pod uwagę, że jeszcze mało wiem. -
Witamy nowych użytkowników
dargeo odpowiedział(a) na Adam_Jesion temat w Społeczność AP (Rozmowy o wszystkim)
Witaj -
Gdzie?
-
To muszę podłączyć wyciąg do komputera bo inaczej nie da rady wpisać parametrów i spradzić będzie łatwiej.
-
Nie jesteś jedyny, który może dziękować Ilu . Mi też wiele pomógł i oczywiście nie tylko on. Podziękujmy wszystkim, którzy mają wkład w to, że żyje nam się lepiej
-
przy następnej pogodzie znów będę ustawiał (dziś będzie chmurno )
-
Gwiazdki idealne jedyne co to troszkę mgławic brakuje w okolicy
-
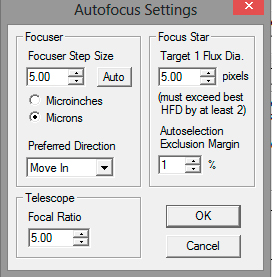
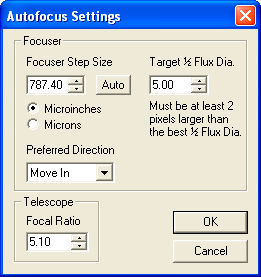
Maćku nie używam calowych. Microns (opcja zaznaczona) to są mikrometry i tak mam ustawione Co do ratio nie mam pewności ale zdaje mi się, że gdzieś to wyczytałem. . PS. Poszukałem po necie i znalazłem coś takiego "Focal Ratio — światłosiła — podziel długość ogniskowej przez średnicę zwierciadła głównego" jeśli to prawda to powinienem mieć ustawione na 4 bo taką mam światłosiłę. 800mm/203mm=3,94
-
sprawdzałem na rożnych krokach exposure już dzisiaj nie sprawdzę bo odłączyłem sprzęt a bez tego nie pokaże
-
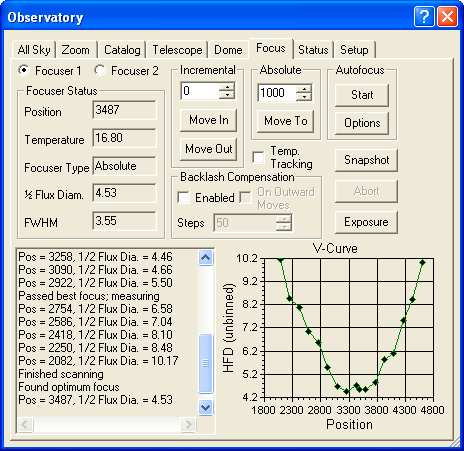
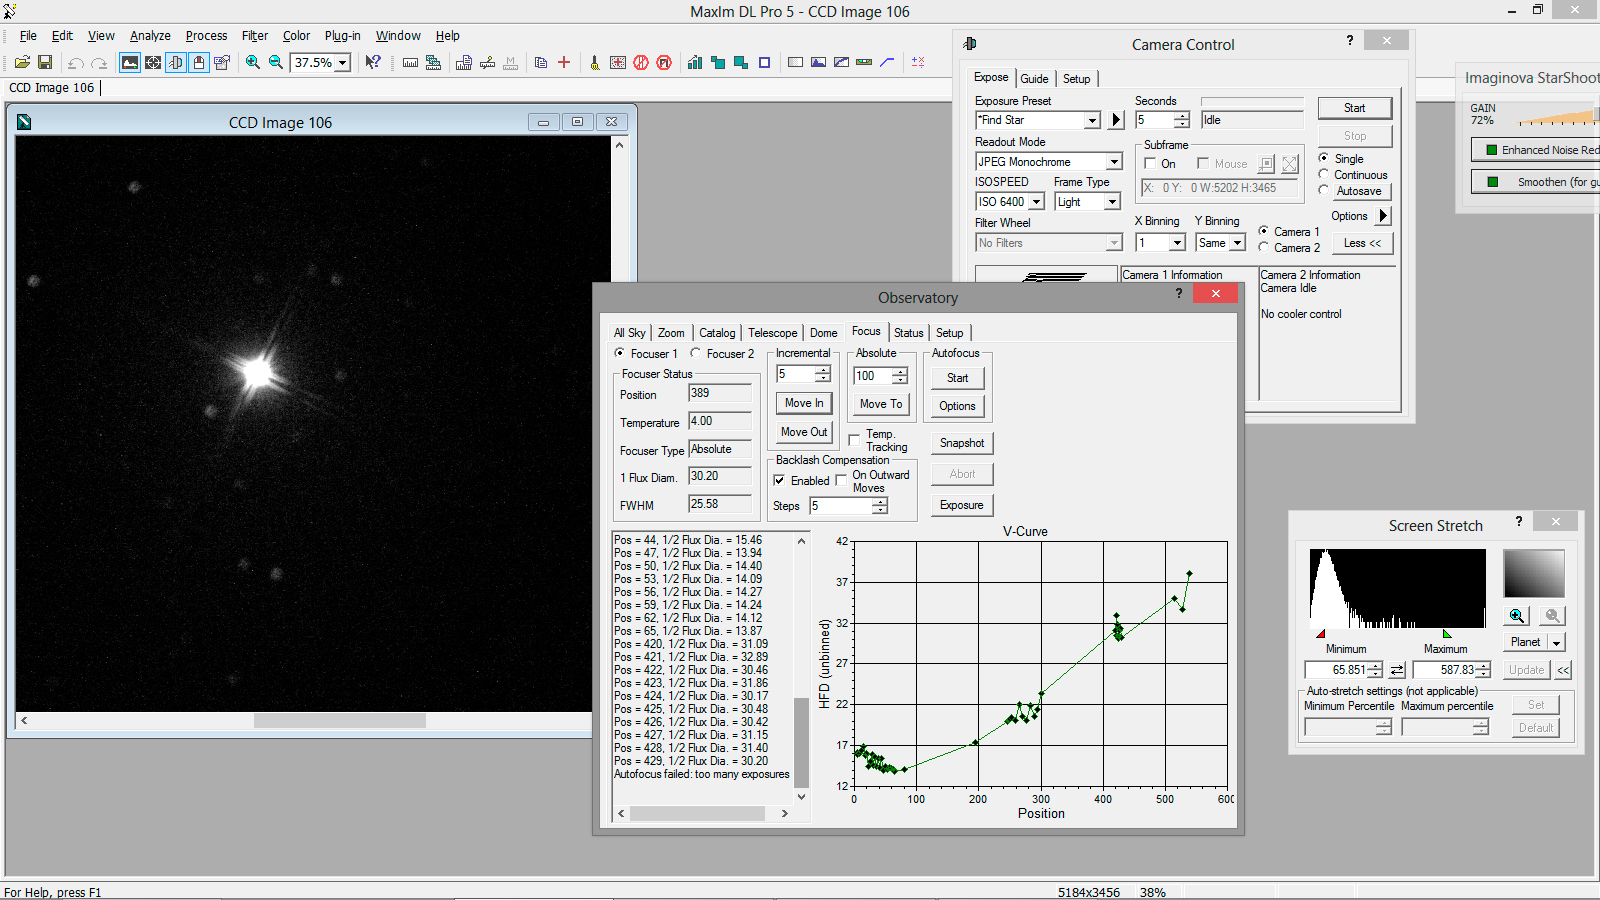
Coś takiego jest w helpie maxima Autofocus Autofocus requires a compatible digital focuser with absolute positioning, i.e. it uses a stepper or servo motor. If you are using an open-loop DC motor (relative focuser) then we recommend using FocusMax, available from http://focusmax.org. This tutorial assumes you have your telescope and camera operating. The first step is to set up the focuser. Select View menu Observatory Control Window and select the Setup Tab. Under Focuser 1, click the Options menu and click Choose. The ASCOM Chooser will appear. Select the focuser model you are using, and click Properties to set it up. The exact settings depend on the model of focuser you are using, and how it is connected to the telescope. Please consult the manufacturer's instructions for more information. When you are done click OK. If you have a computer-controllable telescope you can set it up and connect it as well. This is convenient for adjusting the telescope pointing but not required. Switch to the Focus tab. Check that you can adjust the position of the focuser. Change the Absolute position value and click Move To. The focuser should move to the new position. You can also adjust incrementally; set the Incremental step size to 50 and click Move In or Move Out. Take an image with the camera to verify that the focuser is actually moving and the focus is changing. Under Autofocus click the Options button. There are several parameters that must be set up correctly for autofocus to work. The Telescope Focal Ratio is essential. It determines the depth of focus, and therefore the step size that is used when hunting for best focus. The focal ratio is often found in the telescope manual; it can also be calculated by dividing the focal length by the aperture. Also essential is the Focuser Step Size. Some digital focusers know what this is inherently; you can click the Auto button to fill in the information. Other digital focusers do not have this information; they are just motors hooked up to focusers from other manufacturers. In this case, take out a ruler! Move the focuser 1000 steps, measure the distance it moves, and divide that by 1000. Enter that into the Focuser Step Size (be sure to set Microinches or Microns as appropriate). (Tip: if you cannot see the focuser move, as for a Schmidt-Cassegrain telescope, focus the telescope with an eyepiece, move the focus out 1000 steps, and then pull the eyepiece out of the focuser until the image is sharp. Measure the distance the eyepiece is moved.) You also need to set the Target 1/2 Flux Dia. The Half Flux Diameter is a measure of how large the star images are, in pixels; obviously we want them to be as small as possible. The target needs to be set somewhat higher than the optimum; typically by 2 pixels. This is required because the measurements are made on either side of focus, not right at focus. Typical values are 5 to 7, but it depends on how small your star images are at best focus. Once you are done, click OK to return to the Focus Tab, then click Exposure. Set Delay after Move to 0, Exposure Time to 1 second, Binning to 1, Subframe Width and Subframe Height to 100. If your camera has a shutter turn on Apply Auto-dark calibration. If your camera is very slow or is one-shot color, turn on Use Fast Download if available. Click OK. Point the telescope at an isolated star, approximately 5th magnitude. You want the star to be bright enough to give a good signal-to-noise ratio, but not have it saturate when you are near focus. If the star is too bright then autofocus will not work properly. Now click the Start button. Focusing takes a minute or two as MaxIm DL first performs coarse focusing, then switches to fine focus mode and determines the change in star image size on both sides of the region of best focus, and finally computes and moves to the optimum focus position. Watch the log and the V-Curve. During fine focus, the Half Flux measurement should change about 1.5 pixels every time the focuser moves (anywhere between 1 and 1.5 is okay). If it moves too quickly, open the Options and increase the Focuser Step Size. If it moves too slowly, decrease the Focuser Step Size. This will provide optimum focus speed and accuracy. The V-Curve will continue past best focus for a bit. If it keeps right on going without detecting best focus, check the Target 1/2 Flux Dia setting. This number must be bigger than the best focus achieved by approximately 2 pixels. Once the V-Curve has traced out both sides of focus far enough, it will be able to calculate the position of best focus, i.e. at the center of the V. The focuser will be commanded to go to the optimum position, and a last image will be take so you can see the results. The focus will now be spot-on; often more accurate than you could achieve manually.
-
1. chodzi o to że nadal robi Bóg wie ile zdjęć. 2. nie wiem czy dobrze myślę ale wydaje mi się, że po złapaniu wykresu powinien ustawić się w odpowiedniej (ostrej) pozycji 3. nadal nie wiem co to za cholerne parametry są poza tymi co niżej wymieniłem Move to - idź do położenia Move in/out - przesuń w jedną lub drugą stronę o zadaną wartość Incromental - wartość skoku
-
o co tu chodzi bo zaraz wyjdę z siebie. Jak to dziadostwo działa?
-
Oczywiście, że jestem zainteresowany
-
No przecież niedawno kolimowałem cały teleskop a jak sam piszesz łatwo nie może być więc LW do powtórnej kolimacji a co za tym idzie i LG . Astro to piękna rzecz
-
czekam na pogodną noc i postaram się wyprostować blaszki
- 1 815 odpowiedzi
-
- 1
-

-
- Sky-Watcher AZ-EQ6 GT
- DO-GSO 8 F/4 M-LRN OTA
- (i 8 więcej)
-
Kocham WAS . PRZEPRASZAM JAK KTOŚ COŚ ŹLE ZROZUMIAŁ PRZEPRASZAM NAWET JAK DOBRZE ZROZUMIAŁ OGÓLNIE PRZEPRASZAM A ZAWSZE MNIE UCZYLI ,
-
Łukasz uwielbiam Cię . Byłbym idiotom jak bym nie brał pod uwagę pomocy merytorycznej . Czy ja niewyraźnie piszę ?? Wszak pisałem, że nikogo przy mnie nie było podczas zmagań ze sprzętem i nic tego nie zastąpi. I tak należy to rozumieć
-
Co w tym głupiego??? Można przeczytać tysiące porad i setki książek ale to nie zmieni faktu, że przekazanie zagadnienia w formie bezpośredniej jest o wiele bardziej zrozumiałe i szybsze.